
My go to Instagram scheduling app with Instagram Partnership.
There are lots of applications and services which let you schedule your Instagram posts.
What you want to look for is a service which has:
- Instagram Partnership — this ensures that you can schedule posts and automatically upload them, so you don't have to manually do the posting.
If the scheduling service you use has an Instagram Partnership; that way Instagram has agreed for that service to connect to the Instagram Graph API — so you don't have to worry about breaking the Instagram Terms of Service.
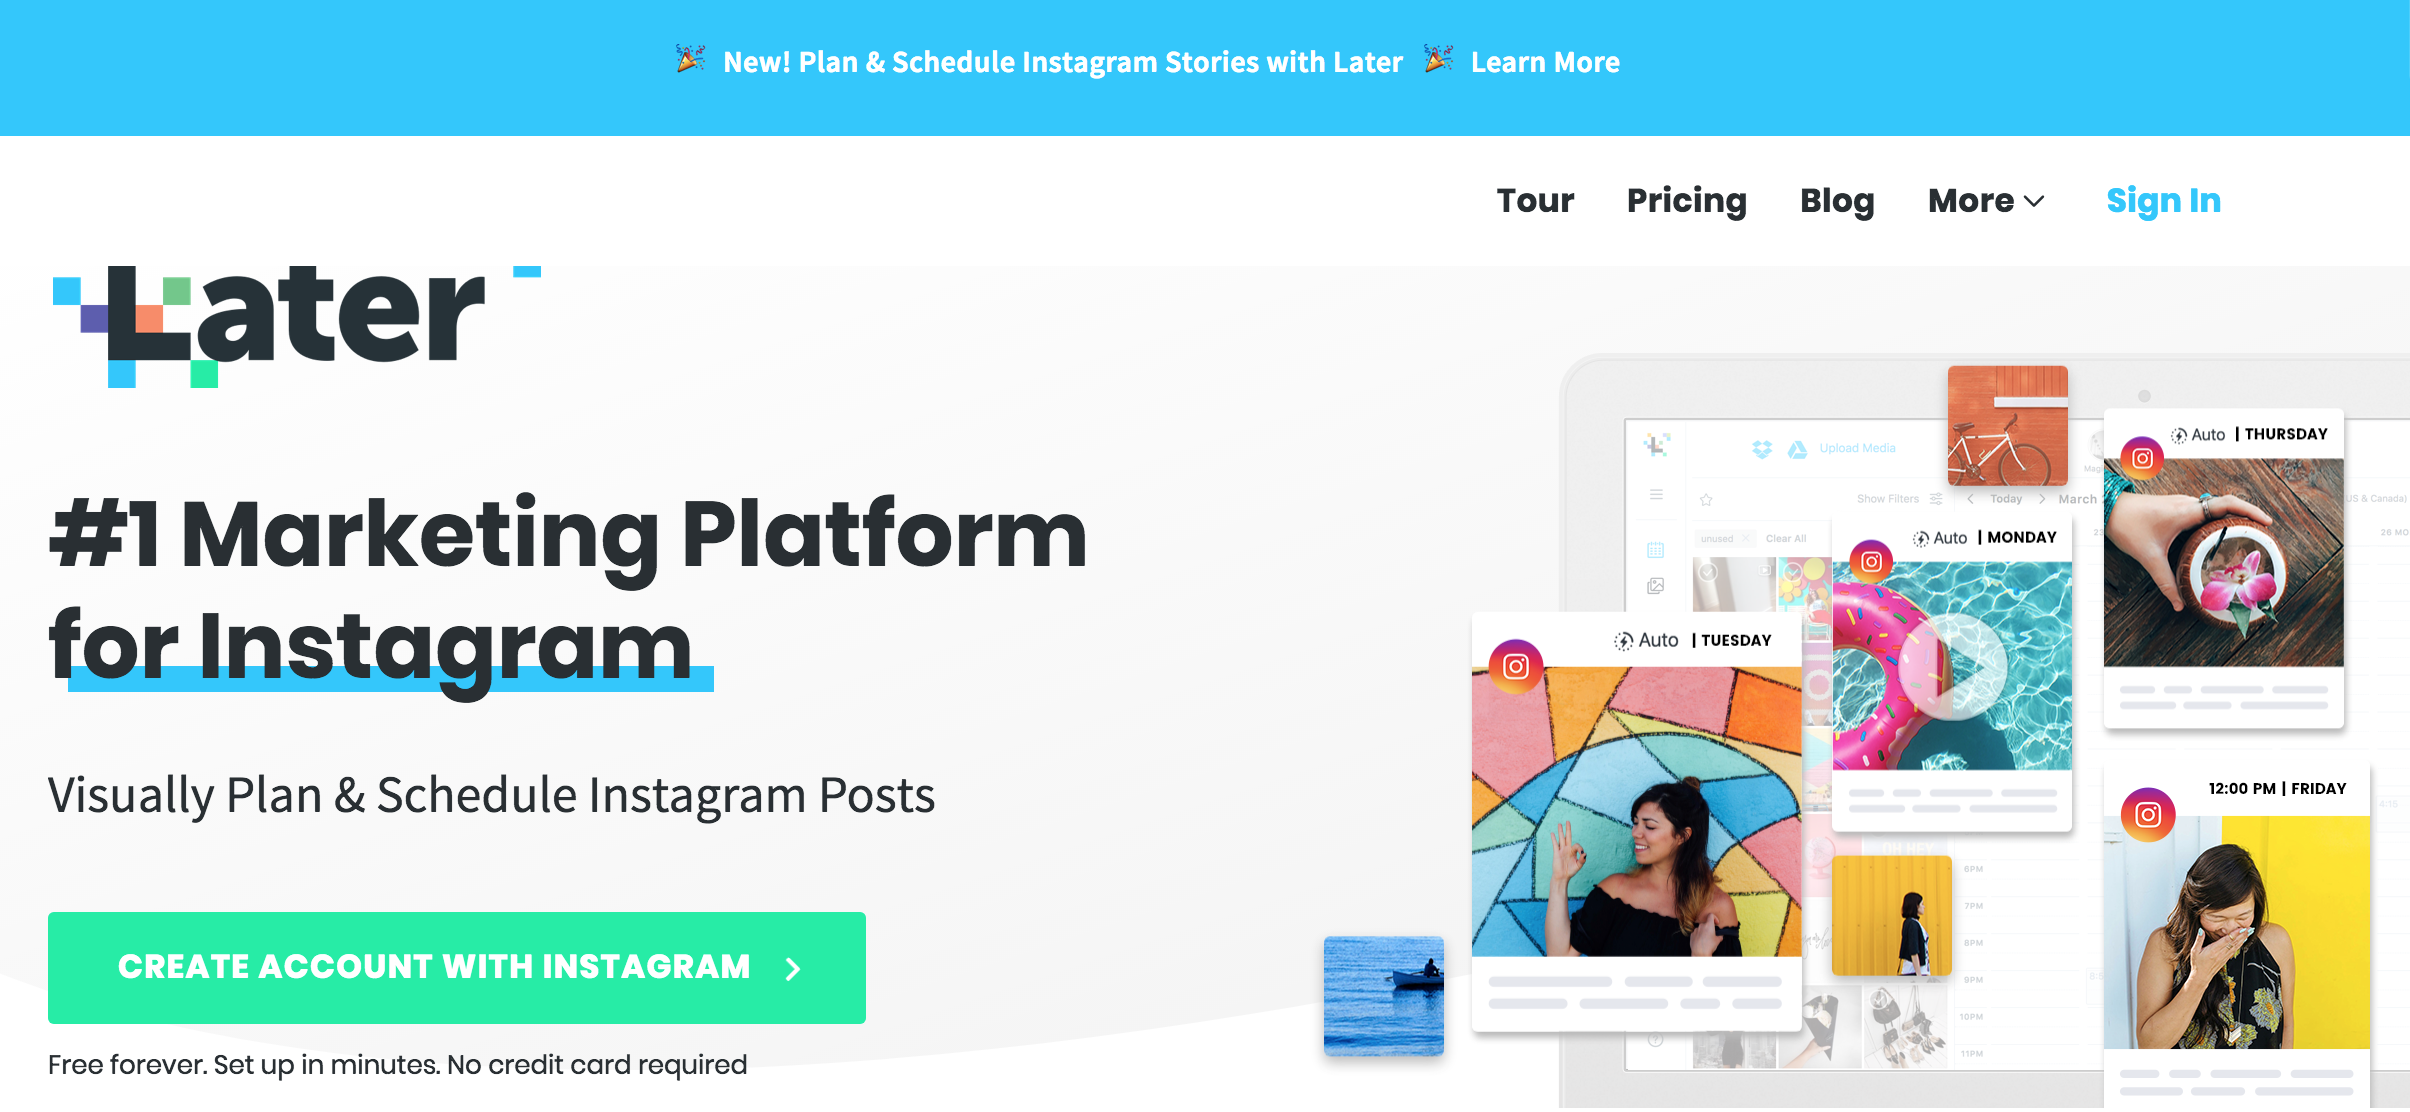
There is one scheduling application I highly recommend which has Instagram Partnership, free and paid plans and is trusted by over 600,000+ brands.
And it's called Later.
What great is that Later has a free plan which lets you:
- Schedule 30 Instagram posts per month (photos only)
- Preview your Instagram grid to ensure it looks good and is cohessive
- View their own version of Instagram analytics
- Plus lot's more...
You can see the various plans they offer here and what is included:

Of course, if you have the budget you can upgrade to a premium plan which starts at $9/month.
And with anything, you get fantastic features for the price you're paying:
- 100+ posts per month
- Location and user tagging
- Reposting, Instagram stories scheduling
- Pro Instagram analtyics
- And more...
But hey, its your choice on what plan you use.
Either way, for the purpose of this guide we will use the Later Free Plan.
I've hooked you up so that when you join you get a bonus +10 posts on the free plan :)
Alternative Instagram scheduling apps
In case you're looking for an alternative scheduling app because later.com doesn't tickle your fancy... I've got you covered:
1. Buffer — buffer.com
2. Hootsuite — hootsuite.com
3. Tailwind — tailwind.com
4. Planoly — planoly.com
How to automatically schedule your Instagram posts using Later.
Firstly you will need to create an account and link your Instagram to Later; then you can start scheduling posts.
Step 1: Create a Later account
Head on over to Later.com and click on the big juicy green button that says "Create Account With Instagram" and follow the steps to setup an account.

Step 2 (important): Switch your Instagram profile to business
To schedule posts that are automatically uploaded by Later, you will need to switch your Instagram account from a personal profile to a business profile.
This is a requirement from Instagram to let you schedule, and most importantly, automatically upload posts through a third party.
Creating a business profile is easy and free.
To switch your Instagram to a business profile follow these steps:
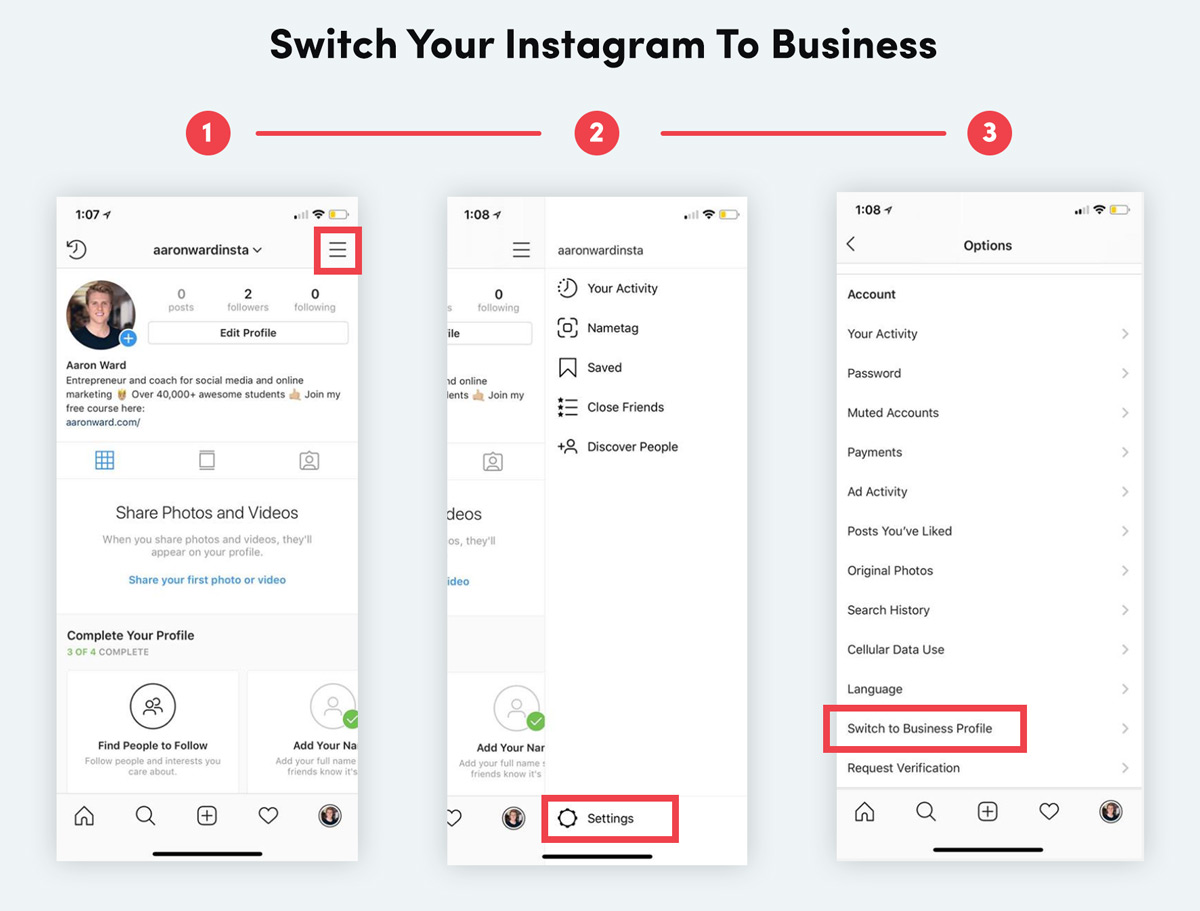
Written steps to switching to a business profile:
- On your Instagram profile/page, click the menu icon (three lines) at the top right of your Instagram profile.
- When the sidebar shows on the left hand side, at the bottom click on "Settings".
- Finally, look for the option "Switch to Business Profile" and follow the steps to connect to your business Facebook page.
Step 3: Discover your best times to upload so scheduling is optimized
Using your Instagram Insights, you can learn what times are best for you to upload photos or videos.
This is really important because you want your posts to be seen by as many of your followers as possible.
This will increase your engagement and Instagrams ranking score.
To find your best posting times on Instagram:
You can find your best times to post directly inside of the Instagram Insights > Audience section.
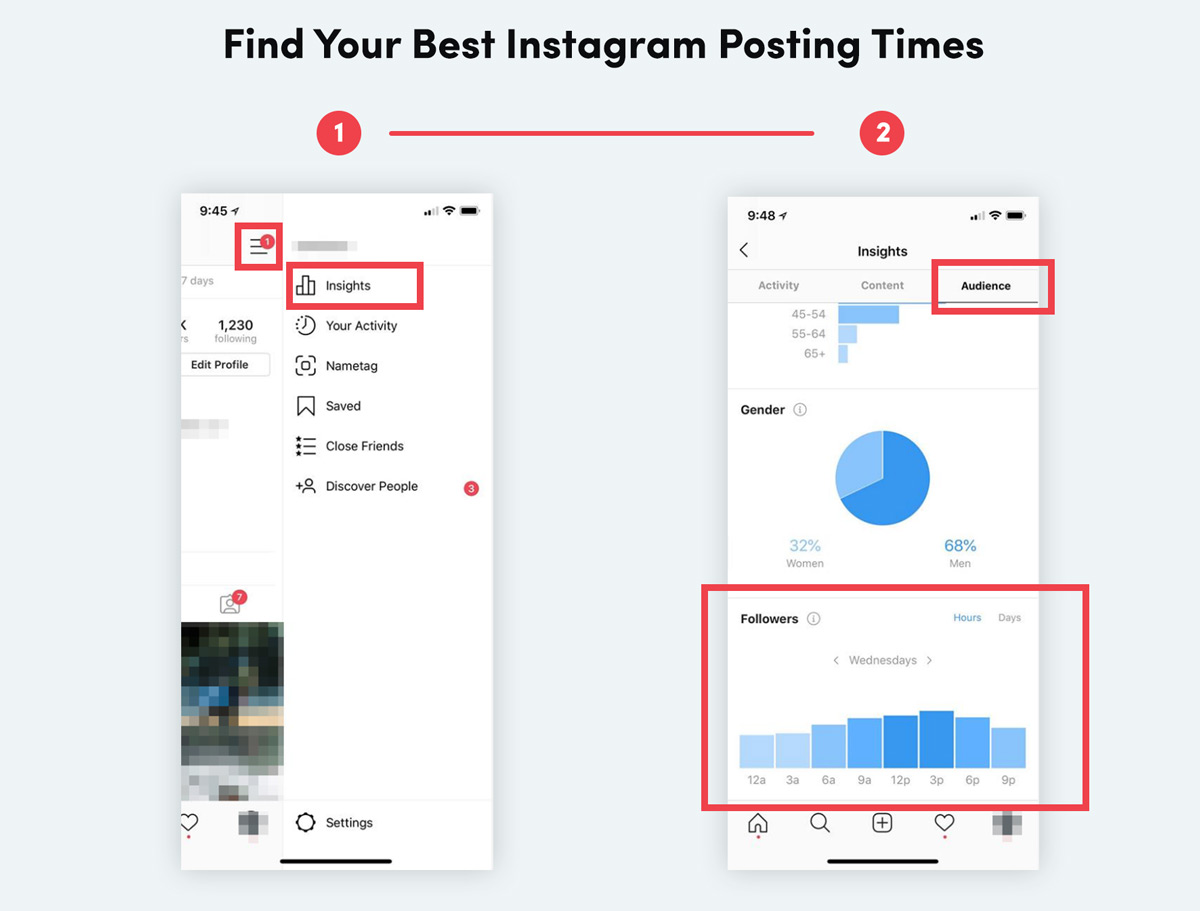
Written steps to finding your best posting times:
- On your Instagram profile/page, click the menu icon (three lines) at the top right of your Instagram profile.
- When the sidebar shows on the left hand side, click on "Insights".
- Inside of Insights, click on "Audience" on the top navigation bar
- Finally at the bottom, in the Followers section, click on Hours and switch between each day to see when your followers are most active.
Make a note of these times somewhere as they will come in handy when you start choosing the times you want your Instagram posts to be automatically posted.
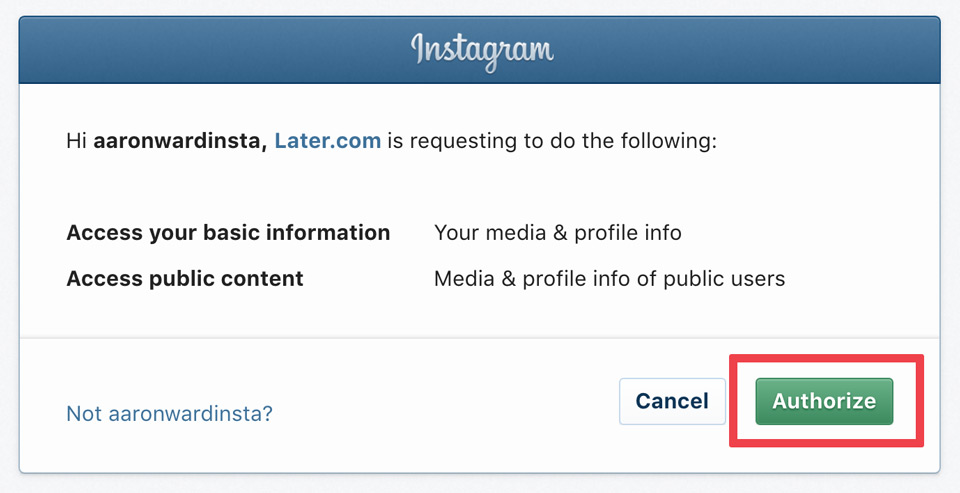
Step 4: Connect your business account to Later to allow for automatic posting.
An important step...
Otherwise you won't be able to post automatically.
Login to Later and press Accept when they ask to authorize access to your Instagram account.
Next you want to connect your business profile as it doesn't do this automatically for you.
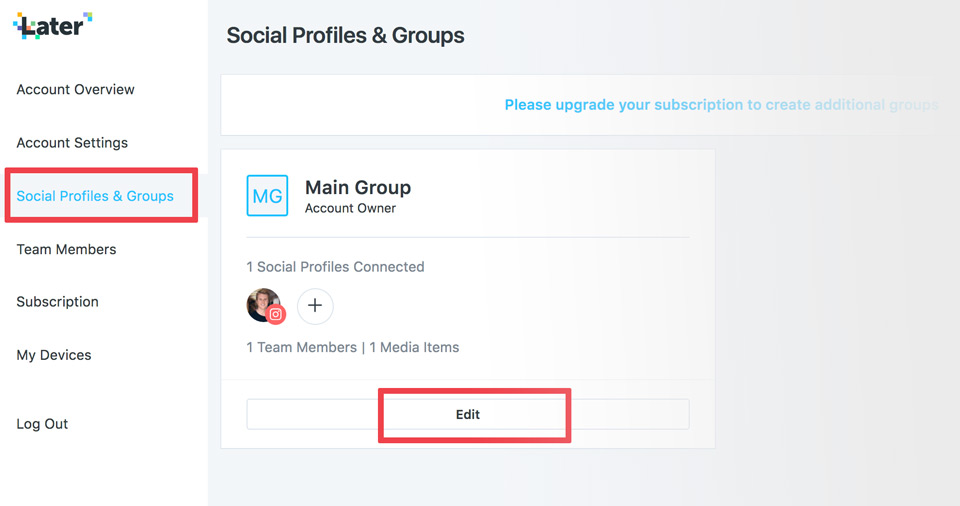
Click on "Settings" in the Later Dashboard.

Click on "Social Profiles & Groups" in the sidebar, and then "Edit" on your connected Instagram account.
Finally, click on "Connect Business Profile" and follow the steps that show up.
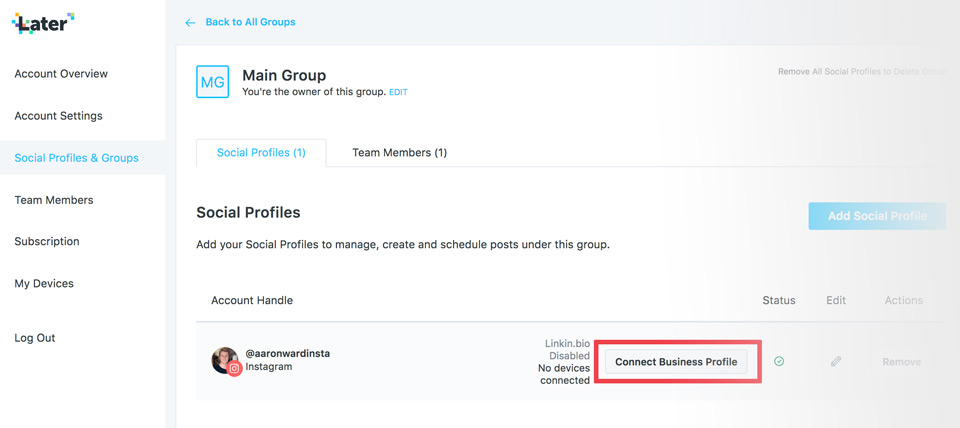
You've now connected Later to your business profile; this lets you automatically post!
Finally, head on over to the Later Dashboard and click on "Setup Now".

You will be taken through the steps of downloading the Later App to your phone so you can start scheduling posts.
Step 5: Start scheduling posts to upload automatically.
The fun part!
You're now able to schedule posts using the Later Dashboard.
I'll take you through step by step on how to automatically upload Instagram posts using Later.
Plus it gets better because:
Below I'm going to share my tips and strategies you can use to optimize your posting process.
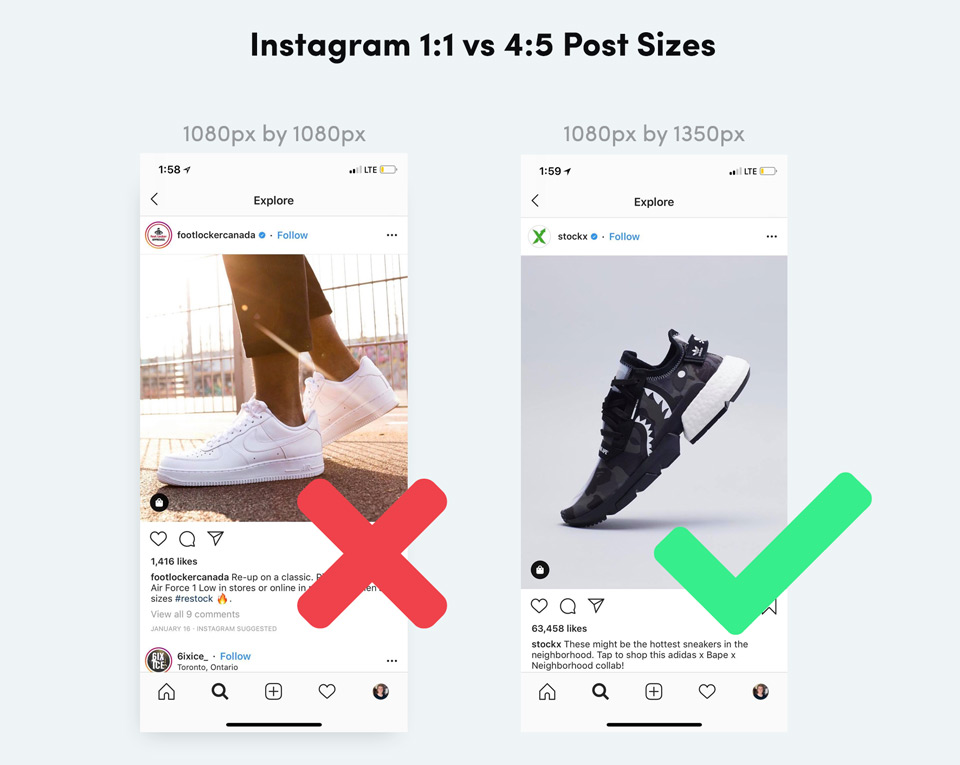
Take photos in a 4:5 format (or edit them to be 4:5).
On Instagram you want to upload the highest of quality posts.
And you want to use all the space (or real estate) that you can.
Therefore, make sure your posts are in a ratio size of 4:5.
In simple terms this means have your image size to be 1080px (width) by 1350px (height) for maximum HD quality.
Organize your Instagram posts first.
I like to create Instagram posts in batch.
And I recommend you do the same, because it will save you a lot of time if you focus on creating lots of posts at once.
And this guide is all about saving time soo.....yeah.
Sometimes I will create 7 posts at once — uploading 1 post per day. Or I'll find 30+ posts if I am reposting content.
It's a smart idea to name your posts 1, 2, 3, 4, 5 and so on too...
Because when you upload them to Later they will be in cronological order.
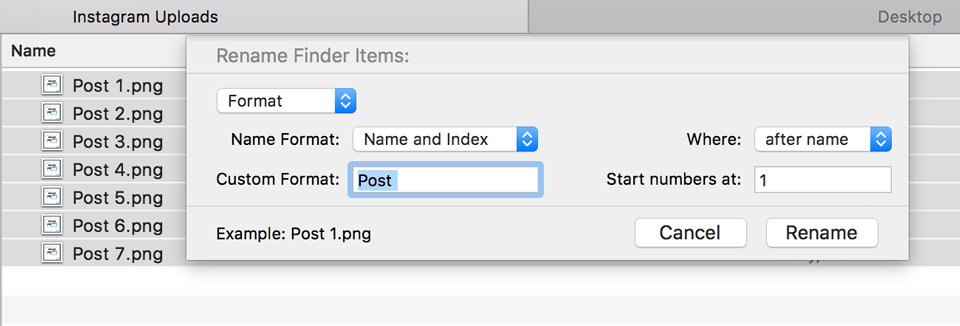
Pro tip: If you're on a Mac select all your images...right click...rename items. Then you can choose custom format and use options such as "post" and "1" to mass rename.
Schedule and automatically upload Instagram posts on Later.
To schedule a post using Later you will need at least 1 post which is ready to be uploaded.
Lets start:
On the left hand side of the Later Dashboard, you will want to drag in your posts to the media manager pannel.
You can see below I've done this for one image and also switched the Calendar view to Month on the right hand side (optional).
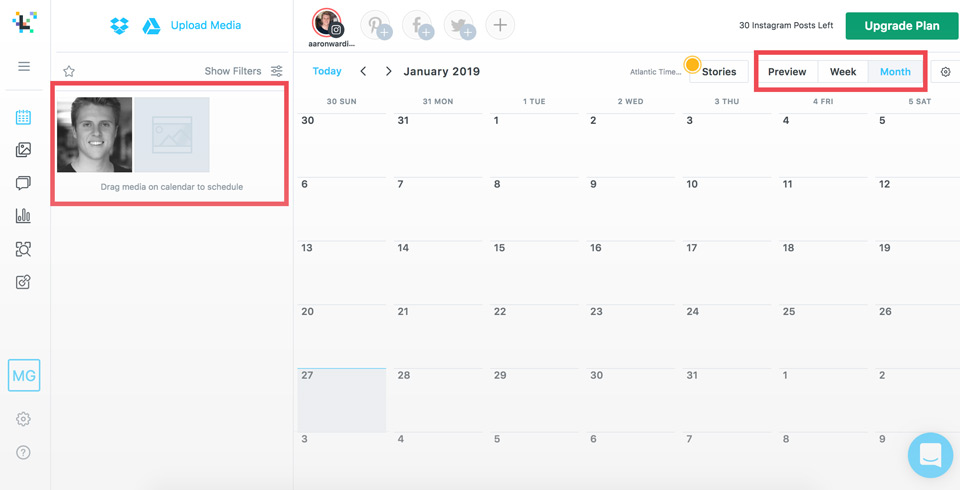
After you've uplaoded your posts, you will want to drag your image or video from the Media Manager Panel to the day you want to upload on.
For example, I'll drag my image to be uploaded on the 29th of January.
Once you do this:
An interface will appear where you can choose your:
- Caption — tell people about whats happening in the photo or offer value.
- Hashtags — Include hashtags in your niche for people to discover you.
- Tag Users — Make sure to tag yourself as well as anyone else relevent to your image as it's another way people can discover you.
- Location — Tag the location you took this photo, even if its broad! It is another way for people to discover your account and increase your reach.
- Upload time — Choose your best upload time using your Instagram Insights which we discussed early.
- Upload type — You can choose to automatically upload your Instagram post or recieve a notificaiton on your phone where you manually post it.

You've now successfully scheduled a post which will be automatically uploaded to Instagram.
Now just repeat the process for other posts you have...
You'll never worry about having to be on your phone at a specific time, or from being banned due to using third party applications that are not an Instagram Partner.
Before we finish:
Other important features to mention that we didn't cover, which you should check out, is that you can:
- Edit your photos in the scheduling interface
- Use the Analytics tool in the left hand sidebar navigation
- Repost users content, also found in the left hand sidebar navigation
- Preview your feed by clicking on Preview in the Calendar Panel


Did something stand out? Let me know your thoughts below!